Magnum Protein Adduct Pipeline
This tutorial covers how to run the pipeline for protein adduct discovery and visualization using Magnum, Percolator, and uploading to Limelight as discussed in:
This tutorial assumes you have Docker installed on your system. Please see our Docker Installation Tutorial to get Docker installed. Because Docker is being used, you do not need to install Magnum, Percolator, or the Limelight XML converter.
We have also made example data input files available, and the steps below include downloading those.
Note
Although this tutorial makes use of Docker, Docker is not required to run these programs. Please see the web sites for the individual programs for more details on other ways to run the software.
Set Up Your Project Folder
Open up a terminal. If you are on Windows, follow the directions on our Docker Installation Tutorial to open a Linux terminal.
Create a project folder
mkdir ~/my-project
cd ~/my-project
Copy the example input data into the project folder
# download data from Google Drive into your project directory
wget --load-cookies /tmp/cookies.txt "https://docs.google.com/uc?export=download&confirm=$(wget --quiet --save-cookies /tmp/cookies.txt --keep-session-cookies --no-check-certificate 'https://docs.google.com/uc?export=download&id=13IeYZu2Jb71VjBlw2BxFMO-3yFJV33Jl' -O- | sed -rn 's/.*confirm=([0-9A-Za-z_]+).*/\1\n/p')&id=13IeYZu2Jb71VjBlw2BxFMO-3yFJV33Jl" -O treated.tgz && rm -rf /tmp/cookies.txt
tar -xvzf treated.tgz
Note
If you are using macOS, you may not have
wgetinstalled on your system so the above step may fail. You can downloadtreated.tgzusing a web browser using this link, and then save it to your project directory and runtar -xvzf treated.tgz. You can alternatively installwgetusing Homebrew by typing the following:# install Brew (if it is not installed) ruby -e "$(curl -fsSL https://raw.githubusercontent.com/Homebrew/install/master/install)" # install wget brew install wgetIf the above was successful, you can delete
treated.tgzrm treated.tgzYou should now have three files in your project directory:
SearchDatabase.fasta- A FASTA-formatted text file containing protein sequences to be searched.
treated-Magnum.conf- A Magnum configuration file, pre-configured for this tutorial. For more information about configuring Magnum, visit the Magnum configuration website.
treated.mzML- The raw data from the mass spectrometer converted to mzML format.
Run Magnum
Ensure you are in your project directory (where you copied the files above).
cd ~/my-projectRun the Magnum search.
sudo docker run --rm -it --user $(id -u):$(id -g) -v `pwd`:`pwd` -w `pwd` mriffle/magnum:alpha5 ./treated-Magnum.confYou should see Magnum output its progress as it searches the file.
Visit the official Magnum website for more information about Magnum.
Run Percolator
In the above example, Magnum would have generated a file named treated.perc.txt. This is the input file for
the Percolator post processing software. To run percolator enter:
sudo docker run --rm -it --user $(id -u):$(id -g) -v `pwd`:`pwd` -w `pwd` mriffle/percolator:3.05 percolator -X percout.xml treated.perc.txt
This will generate a file named percout.xml that contains the percolator results in XML format.
Visit the official Percolator website for more information about Percolator.
Convert results to Limelight XML
To import data into Limelight, it must be converted to a Limelight XML file. After running the above steps you should have the following files (plus others) in your project directory:
treated-Magnum.conf- configuration file used by Magnum
treated.pep.xml- Magnum search results in pepxml format. This will have the prefix of your mzml file name and the suffix ofpep.xml.
percout.xml- The results from running percolator.
SearchDatabase.fasta- The FASTA file you used to perform the Magnum search.
To generate the Limelight XML file, enter the following:
sudo docker run --rm -it --user $(id -u):$(id -g) -v `pwd`:`pwd` -w `pwd` mriffle/magnum-percolator-to-limelight:v4.1.1 -c ./treated-Magnum.conf -p ./percout.xml -f ./SearchDatabase.fasta -m ./treated.pep.xml -o treated.limelight.xml
Here is that same command in multi-line format with comments. Note the command below won’t run as-is, it is only meant to show you which parameters are being used in the event that you need to change the values.
sudo docker run --rm -it --user $(id -u):$(id -g) -v `pwd`:`pwd` -w `pwd` mriffle/magnum-percolator-to-limelight\
  -c ./treated-Magnum.conf     # the Magnum configuration file
  -p ./percout.xml             # the output from percolator
  -f ./SearchDatabase.fasta    # the FASTA file used in the search
  -m ./treated.pep.xml         # the Magnum results
  -o treated.limelight.xml     # the limelight XML file that will be created
You should now have a treated.limelight.xml file that will be used to import the results into Limelight.
Visit the converter GitHub repository for more details about this converter.
Upload to Limelight
Important
This section assumes you have access to a running Limelight installation. You may use the installation at https://use.limelight-ms.org/ or you may run your own. To run your own follow our Limelight Installation Tutorial.
To view the results in Limelight, use the Limelight web interface to upload the Limelight XML and (optionally) the mzml file.
Steps to upload your data to Limelight:
Log into Limelight
Navigate to an existing project or create a new project.
Scroll down to the
Upload Datasection and click the arrow on the left to expand the section.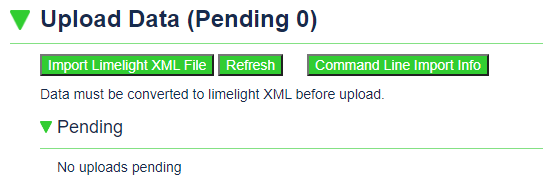
Click the
Import Limelight XML Filebutton. You should see the following dialog appear:
Enter a description of this run. E.g.,
Treated.Click on the
+Add Limelight XML Filelink and select your Limelight XML file on your computer.Note
Windows Users: Access to files on WSL 2 (Linux) is slightly more complicated than accessing normal files. You have two options:
You can copy your Limelight XML file (and, optionally, mzML file) to a Windows directory, such as
C:\data_directory. To copytreated.limelight.xmltoC:\data_directory\you would enter the following into your terminal.mkdir /mnt/c/data_directory cp ~/my-project/treated.limelight.xml /mnt/c/data_directory/treated.limelight.xml # optional: if you wish to upload and view spectra cp ~/my-project/treated.mzML /mnt/c/data_directory/treated.mzMLNote:
/mnt/c/data_directorycorresponds toC:\data_directory. To select your data to upload below, you would navigate toC:\data_directory.You can access the files on your WSL 2 (Linux) installation directly. When you click
+Add Limelight XML Filea file browser will appear. At the top, click in the address bar. Erase what is there and put in:\\wsl$\Ubuntu-20.04\homeand hit the Enter key. You will see your Linux home directory listed. Double click your home directory, then double click my-project. You should see your files from this tutorial listed here.(Optional) Click on the
+Add Scan Filelink and select your mzml file on your computer. This is required if you would like to view spectra associated with peptide identifications.Click the
Submit Uploadbutton to submit your data to Limelight.
After several minutes, refresh the page and your search should appear under the Explore Data section
of the project page. Click on the Peptides, Proteins, or Modifications links to view the
data.
Optional: Analyze and upload the untreated sample
The above steps search and upload the results for the treated sample. If you would also like to search and upload the untreated sample to compare in Limelight follow these directions.
Get the untreated data
Ensure you are in the project folder
cd ~/my-projectCopy the example input data into the project folder
# download data from Google Drive into your project directory
wget --load-cookies /tmp/cookies.txt "https://docs.google.com/uc?export=download&confirm=$(wget --quiet --save-cookies /tmp/cookies.txt --keep-session-cookies --no-check-certificate 'https://docs.google.com/uc?export=download&id=1AzGMBh9kCByX2K5esBS3RDF-7ZTxsSiK' -O- | sed -rn 's/.*confirm=([0-9A-Za-z_]+).*/\1\n/p')&id=1AzGMBh9kCByX2K5esBS3RDF-7ZTxsSiK" -O untreated.tgz && rm -rf /tmp/cookies.txt
tar -xvzf untreated.tgz
Note
If you are using macOS, you may not have
wgetinstalled on your system so the above step may fail. You can downloadtreated.tgzusing a web browser using this link, and then save it to your project directory and run tar -xvzf untreated.tgz.If the above was successful, you can delete
untreated.tgzrm untreated.tgzYou should now have three files in your project directory:
SearchDatabase.fasta- A FASTA-formatted text file containing protein sequences to be searched.
untreated-Magnum.conf- A Magnum configuration file, pre-configured for this tutorial. For more information about configuring Magnum, visit the Magnum configuration website.
untreated.mzML- The raw data from the mass spectrometer converted to mzML format.
Run Magnum on Untreated Data
sudo docker run --rm -it --user $(id -u):$(id -g) -v `pwd`:`pwd` -w `pwd` mriffle/magnum:alpha5 ./untreated-Magnum.conf
Run Percolator on Untreated Data
sudo docker run --rm -it --user $(id -u):$(id -g) -v `pwd`:`pwd` -w `pwd` mriffle/percolator:3.05 percolator -X percout.xml untreated.perc.txt
Convert Untreated Results to Limelight XML
sudo docker run --rm -it --user $(id -u):$(id -g) -v `pwd`:`pwd` -w `pwd` mriffle/magnum-percolator-to-limelight:v4.1.1 -c ./untreated-Magnum.conf -p ./percout.xml -f ./SearchDatabase.fasta -m ./untreated.pep.xml -o untreated.limelight.xml
You should now have a untreated.limelight.xml file that will be used to import the results into Limelight.
Upload Untreated Data to Limelight
Follow the instructions above to Upload to Limelight.